The MKIII uses 6U high channel modules built using extruded aluminium 'cassettes' made by Fischer Electronik. First we need to sort out all the basic mechanical details of the cassettes and the key dimensions for determining the position of controls on the front panel. Later sections cover specific modules.
In general there are two distinct types of channel modules. First there is the regular channel amp based on the EZTubeMixer channel amplifier with its four push buttons and stepped gain control. Each one has an EQ section and an optional routing section. The second type is the twin line input channel. These have no mic pre controls but contain two identical line input channels each with a three band EQ and an optional routing section.
Basics
The Mark III 6U modules are based on an extruded aluminium cassette made by Fischer Elektronik in Germany. They have several types of 6U cassette but we need one that has a cut-out at the rear so it can be used with 3U backplane PCBs that have a centre support. The preferred type is therefore the Fischer model T:
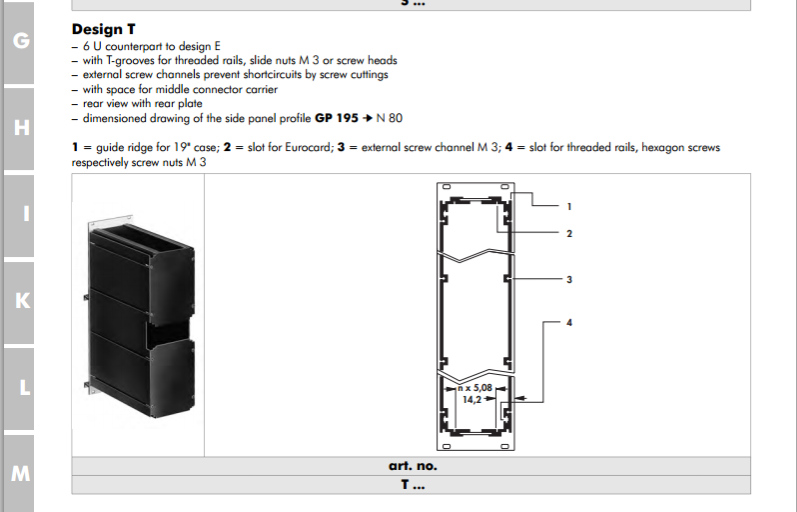
Note: this drawing shows that the top surface of the PCB is 14.2 mm from the left hand side of the front panel. This sets the position of all the controls mounted on the main 6U PCB and is crucial in calculating the x-position of holes on the front panel.
There are several rear panel options. Mostly we just need the type with a single connector hole at the top:

All the modules are 14HP (2.8 inches wide). I have obtained a drawing of the Fischer standard dimensions for this size of front panel:

The overall panel width is 70.9mm. The overall panel height is 261.8mm. The front panel fixing holes are 3.4mm diameter, countersunk and are set in 5mm from the edges.
A standard 6U PCB is 233.4mm tall. We assume the PCB is centred on the front panel. This means the bottom of the PCB is 14.2mm from the bottom of the front panel. This is crucial for calculating the y-position of holes on the front panel.
Mic Pre Channel Amplifier
The MK III mic pre channel amplifier is based on a standard 6U motherboard. This houses standard EZTubeMixer mic pre and gain make up amplifiers with the usual push buttons for phantom power, 20dB pad, mic/line selection and phase change and the standard 12 way Grayhill switch for gain setting. The Grayhill datasheet shows that the centre of the shaft of this switch is 9.35mm above the PCB surface and since the PCB surface s 14.2mm from the left hand side of the front panel, the switch shaft is:
14.2 + 9.35 = 23.55mm from the left hand edge of the front panel
The datasheet for the push buttons shows that the centre of their shafts is 5mm above the PCB surface or 19.2mm from the left hand edge of the front panel. The push buttons will take 6mm diameter round push on knobs so the hole diameter for these should be 6.5mm. The table below shows the y-coordinate of the push buttons and the gain switch on the PCB in mil, the equivalent y-coordinate of the holes for them on the front panel in mm and the corresponding x-coordinate in mm.
Control
|
PCB y-coord ( mil)
|
Panel y-coord (mm)
|
Panel x-coord (mm)
|
Phantom
|
8401
|
227.59
|
19.2
|
Pad
|
8007
|
217.59
|
19.2
|
Mic/Line
|
7614
|
207.59
|
19.2
|
Phase
|
7220
|
197.59
|
19.2
|
Gain
|
6433
|
177.6
|
23.55
|
In addition, provision is made for up to three two deck 12 way Grayhill switches for EQ use. Each switch is wired directly to a 26 way IDC connector. The centres of the shafts of the three switches are set at exactly 1.0, 2.6 and 4.2 inches respectively from the bottom of the PCB. In other words they are 1.6 inches apart starting 1 inch from the bottom of the PCB.. Since the bottom of the PCB is 14.2mm from the bottom of the front panel we can calculate the front panel positions of each switch:
Switch
|
x - position mm
|
y -position mm
|
1
|
23.55
|
39.6
|
2
|
23.55
|
80.24
|
3
|
23.55
|
120.88
|
Depending on the shaft size of the switches, the front panel hole diameter needs to be either 0.25 inches (6.35mm) for the one eighth inch diameter shaft and 0.375 inches (9.6mm) for the one quarter inch diameter shaft.
The EQ itself is housed on a daughter board mounted above the motherboard on pillars and connected to the EQ switches using ribbon cables. Ideally we would like the controls on this PCB to be the same distance from the right hand side of the front panel as the motherboard switches are from the left hand side i.e.
70.9 -23.55 = 47.35mm from the left hand side
Most of the controls on the daughter board will be EQ pots and my preferred type is made by OMEG. The shafts of these pots are 12.5mm from the surface of the PCB. Since the PCB is 1.6mm thick, to get the pot shafts in the right position the pillars need to be:
47.35 -12.5 -1.6 -14.2 = 19.05mm tall.
This is just enough to clear the switches but makes no allowance for the legs of components on the daughter board. In addition 19mm pillars are non-standard so I have decided to use 20mm pillars. This means the EQ pots are 1mm closer to the right hand side of the front panel. This means the x-position of the pot shafts on the front panel is:
14.2 + 20 +1.6 + 12.5 = 48.3mm
The daughter boards is supported by four pillars. The bottom pair are 0.252 inches from the bottom of the PCB. The motherboard fits into slots in the enclosure extrusions so the daughter PCB has to be a little smaller so as not to foul the enclosure. So, the bottom pillars on the daughter board are 0.160 inches from the bottom. If we want the the EQ pots on the daughter board to line up with the EQ switches on the motherboard then the pots need to be:
0.252 - 0.160 = 0.092 inches lower down the PCB
so the PCB y- positions of the pots are: 0.908, 2.508 and 4.108 inches respectively.
There is room between these pots for additional controls where required. To summarise, the front panel positions of the pots are:
Pot
|
x - position mm
|
y -position mm
|
1
|
48.3
|
39.6
|
2
|
48.3
|
80.24
|
3
|
48.3
|
120.88
|
Lastly, there is a pre-set potentiometer used to set the EQ gain make up that needs to be accessible through a small hole in the front panel. The screw of the pot is 7.9mm above the PCB so its x-coordinate is 14.2 + 7.9 = 22.1mm. The centre of the pads of the pot is 5777 mil from the bottom of the PCB. However, the screw is 50 mil below this so the screw is 5727 mil from the bottom of the PCB. Its front panel y-coordinate is therefore:
5.272 * 25.4 + 14.2 = 148.11mm
The hole size needs to be large enough to accommodate a small screwdriver about 3.2mm in diameter so we will make this hole 4mm diameter.
The front panel layout below shows the the basic layout of the controls discussed above:

Specific EQs will be described in subsequent posts.